Third time isn’t such a charm after all.
After back-to-back failures at getting a Japanese driver’s license in the cheapest but most difficult way possible, I decided to take a break for the rest of 2021. It turned out to be a good idea too, because I have a bad habit of repeatedly running head-first into problems rather than taking a step back and considering the situation more clearly.
So, while I was meditating over the New Year’s holiday by decorating vacation homes for animals on my Switch, a nagging thought kept floating around the back of my head from the last exam. When I rode in the back seat that time, the woman taking the test failed at almost the exact same spot on the course as I did the time before – but why?
Then it hit me like a ton of bricks…
・The TURNS!!!
To recap: Each person taking the exam starts with 100 points and loses them with every infraction, big or small. In this particular exam, if their points dip below 70, then the test is finished and they fail. Online there are many lists of how many points each bad move – such as forgetting a turn signal – is worth, but it’s hard to so say if they’re accurate. In general though, it seems that small but unsafe practices will lead to a two-to-five point deduction per instance. So let’s say a driver makes a single five-point infraction during each turn. In that case they would be out after six turns, assuming they also did some other tiny thing wrong which is almost certain in this test.
That woman and myself would have taken the same number of turns to get to the same spot on the course when failing. Therefore, we were probably both mainly bleeding points on our left and right turns.
Up until this point I had been studying online by Googling general terms such as “how to take the learner’s permit exam,” so instead I tried searching “how to make a left turn on the learner’s permit exam” and pretty much right away I hit on a great online resource.
The website Chosen!! Ippatsu Jidosha Menkyo Shiken (“Challenge!! One-Shot Automobile License Test” and which from here on out I’ll refer to as just ”Ippatsu Menkyo”) is a very comprehensive look at everything needed for this exam, written by a guy in Chiba who had already known how to drive, but had to take the exam several times to pass himself. It explains very clearly that ”whoever masters turning, masters the test” and gives lots of detailed advice on how to do it the way they want you to. It wasn’t the only resource I used, but if I had to recommend one, this would definitely be it.
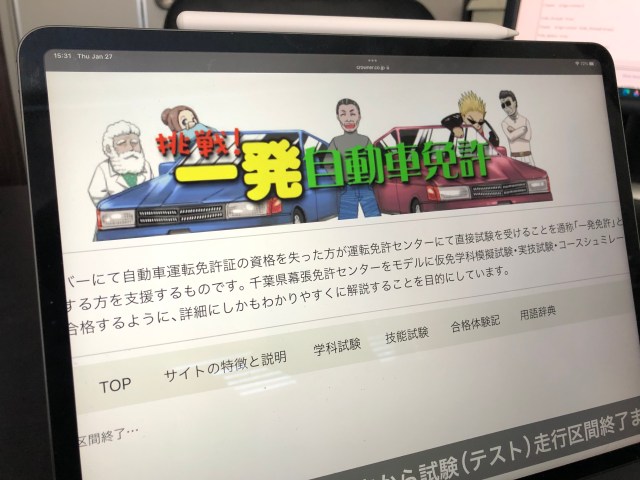
That being said, this isn’t an official study guide and just based on anecdotal evidence. So, combining what this website said with other information found online and in the police manual and video, here’s what I think is needed simply to perform a left turn during the driving test (for right turns just replace “curb” with “center line”).
☆ Check mirrors and blind spot
★ Signal the turn 30 meters (33 yards) before
☆ Wait three seconds
★ Hit the brake just enough to cause the lights to flash on and off, signaling to cars behind that your are about to stop
★ Begin to brake
★ Check mirrors and blind spot
★ Move the car to within 50 centimeters (about a foot and a half) of the curb
★ Stop completely at the indicated line
★ Look left and right
☆ Check mirrors and blind spot
☆ Move a little more into the intersection
☆ Look left and right again
★Turn
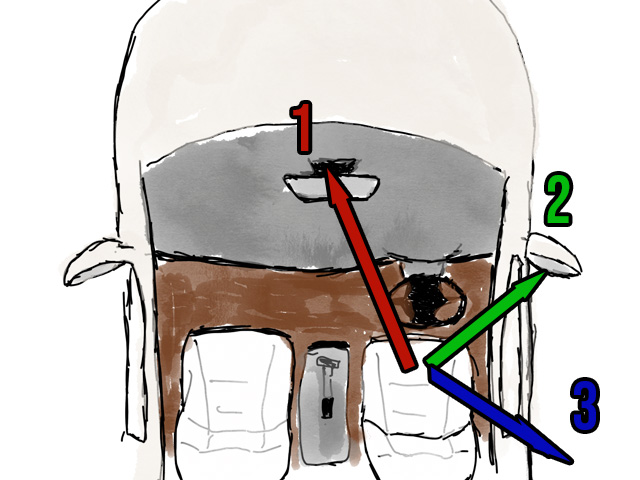
The white stars indicate that it’s debatable whether the actions are really needed to pass, but even without them that’s a lot of stuff to do in a very short span of time. That’s why it is very important to practice this procedure, especially the mirror check in which you must move your head noticeably towards the rearview mirrors, left or right sideview mirror, and back toward the left or right blind spot – rhythmically like “one-two-three.” Remember, the examiner needs to see you looking at the mirrors to know beyond a shadow of a doubt that you’re doing it, and it also needs to be fast in order to keep your eyes on the road.
▼ A left turn/lane-change one-two-three check
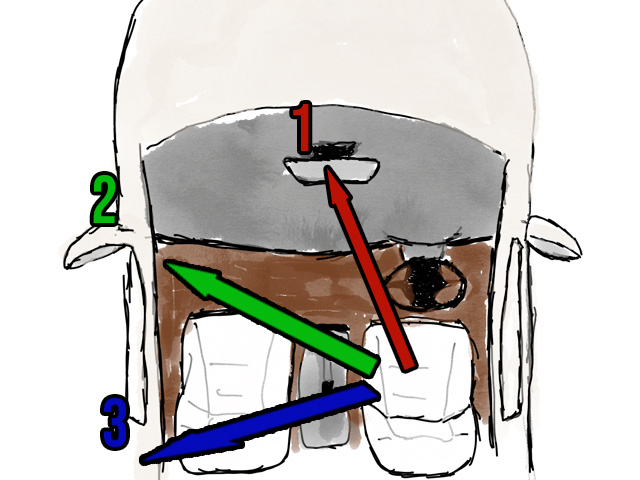
The one-two-three head turn is absolutely crucial, because it needs to be done both during turns and lane changes which you need to do several times throughout the test. Failure to do this, and even failure to do this correctly, will ensure that you never make it to the end. So, it’s important to get really comfortable doing this to the point that it’s pretty much second nature. This is rather difficult when you can’t drive a car, but it’s possible to practice while riding a bike and even walking, if you don’t mind looking strange in public.
▼ A right turn/lane-change one-two-three check
The other tricky part is judging the 30 meters needed to signal. This also needs to be fairly precise in order not to lose points. Ippatsu Menkyo has a good tip of measuring the length of your stride and then pacing out the distance from intersections while out walking to develop an ability to visualize it.
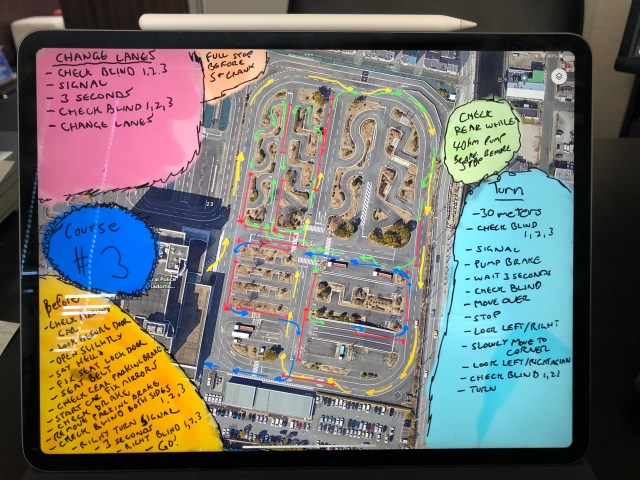
I, however, took a different route and resorted to Google Maps. As luck would have it, they have an accurate scale indicator in the bottom corner, so it’s easy to take a screenshot and mark of the distance from each turn with a ruler. This way I could just go by landmarks, like trees and lanes, when it came to test time.
▼ The red lines indicate 30 meters from each turn in the course.
With this new info under my belt I was feeling pretty good about my chances for the third attempt at this test.
・The Third Test
Despite learning all this, I was still pretty nervous. After all, it was just a bunch of stuff I read on the Internet and there were no guarantees that it would actually work. Because it was the first Monday of the year, the testing center was fairly busy and I ended up drawing a place near the end of the line.
In addition, it seemed like there were a lot more well-prepared people, many of whom made it pretty far along the course. About two people actually completed it, while three or four only got as far as the slope, which worried me greatly because I had yet to get to that part myself.
▼ I’ll explain the slope in a moment
By the time my turn came, they ended up doubling up on cars, so I never had a chance to ride along with someone. That was OK though, because I had already watched a lot from the window.
My starting routine was tight. I checked all around the car, looked both ways before entering, checked the locks, mirrors, gear shirt, parking brake, and seat belts and signaled before pulling out. I don’t mean to toot my own horn, but despite my overwhelming nervousness, I felt I did pretty well. My lane changes and turns included all of the necessary steps and were executed smoothly.
Then I came to the S-Curve. If you recall from my first attempt, this is where you have to drive along a very narrow winding path. I had cleared it on my first time, only to fail almost immediately after exiting. However, this time was different.
Probably most people, when faced with such a narrow opening, would veer away from the curb slightly in order to enter at a smoother angle. That’s how I did it the first time, but this is wrong during the test and will result in a rather large point deduction. The reason being that the driver is leaving a large enough gap for bikes to enter and collide with the vehicle.

Like with all turns, you must hug it very closely so there is no space for anyone else to get in between. That’s what I did this time.
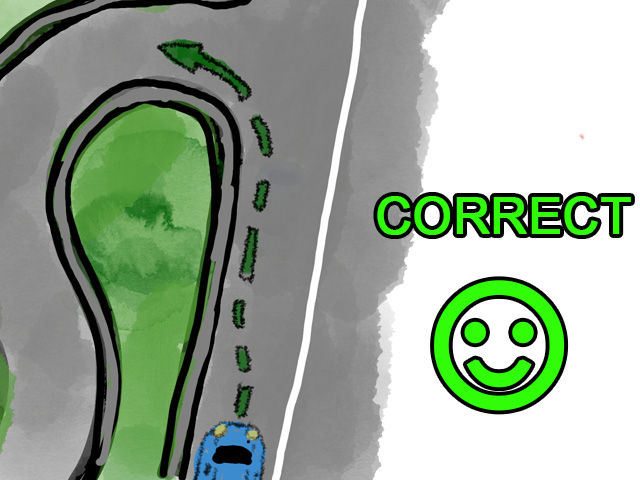
However, just as I came around the angle was so sharp that my rear left wheel clipped the curb and lifted up ever so slightly. With the myriad of reasons for failure surrounding this test I can’t remember if I mentioned it before or not, but touching a curb or white line with your wheel is grounds for automatic failure.
Knowing this, I winced like someone who just got kicked in the crotch and even the officer riding scoring my test let out a sympathetic sigh. “Okay, let’s go back,” he told me gently, knowing that little else needed to be said.
After a failure the officer always gives what’s called “One-Point Advice” in which they point out a single thing you did wrong during the test so that you may work on it. This time the advice was fairly obvious though, so he told me straight: “Well, you touched the curb so you failed but…that was very good.” His actual word was “jozu” which is the Japanese for “good” in the sense of doing something skillfully like playing concert piano or using chopsticks.
And so, I left dejected again with a third failure under my belt, but that “jozu” fueled me to try again. Honestly, I would have gone back out right then and there if they’d have let me, but I had to wait until the following week for another try.
・Back to the Internet
I decided to make the most of this week by finding a failsafe way to enter the S-Curve. Luckily there was a very good YouTube video that illustrated how to do it without the annoyingly excessive chit-chat that many YouTube instructional videos tend to have.
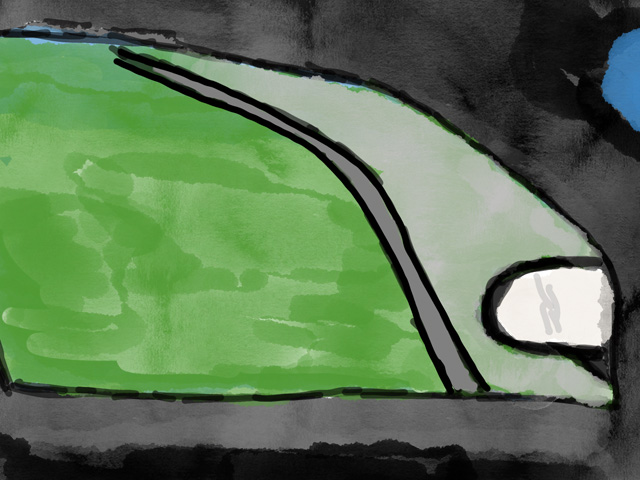
It explains the whole procedure well but I just needed that entry trick, which is actually quite useful for driving in the real world too. The key to entering the S-Curve is to drive very slowly and line up the perpendicular curb with the rim of the passenger side window just past the sideview mirror. Then crank the wheel all the way and very slowly enter.
▼ The car I used had the sideview mirrors mounted on the front end, so I had to image the spacing in the window
Right after the S-Curve is the Crank, which I hadn’t done up to this point, but was basically the same thing only with right angles instead of curves and the entry principle was the same.
Also, since I saw a lot of people fail out on the slope I decided to examine that a little more closely. This is the part where you must stop the car on an upward incline and then start moving again. This is more intended for manual transmission license-takers, but as I saw it can be a widow-maker for automatic drivers as well.
The procedure for this actually isn’t so hard, but speaking as someone who spent years going up and down snow-covered steep mountain roads, it is something I have never had to do in an automatic car in my life. It’s probably a good safety technique to know anyway though, so here it goes:
★ Drive up the slope and stop at the sign
★ Put on the handbrake
☆ Shift the car into 1st gear (or “low gear” on some cars)
★ Slowly take your foot off the brake and look to the side to see if the car is about to roll back. If it is, then immediately hit the brake again and check your parking brake.
★ With the handbrake still on, slowly rev up the engine, but not too much. You just want a nice purr.
★ Slowly release the parking brake and slowly continue up the slop
★ VERY slowly ride the brake down the slope to the stop sign
☆ Put the handbrake on again
☆ Shift back into Drive
☆ Release the handbrake and continue
I’m inclined to say the 1st gear step is a must because they say to do it it in the official video at the testing center, but a lot of online resources don’t seem to mention it. So maaaaybe you can get away without it? Also, based on chatter online and what I saw at the center it seemed that too fast a descent on the downward slope is what got more than a few people flunked.
・The Fourth Test
By the time the fourth test rolled around, I was surprised to find that I wasn’t feeling scared at all. On the contrary, I was rather angry. I felt like I had been robbed last time, and now that I had all the knowledge I felt I needed, I was going to beat this exam into submission. As I rode my bike to the testing center I felt calm, cool, and collected. I was Ice-T – a stone-cold cop killer – only on this day I was ready to kill these cops with the overwhelming pleasure of witnessing amazingly safe driving techniques.

As usual I was able to walk around the course before the exam. However, by this time I pretty much had it committed to memory and could do it with my eyes closed. I was no longer seeing asphalt, trees, and stop signs. I was seeing codes and prompts stream in front of me like Neo in the Matrix: “Turn Here,” “Signal Here,” “Check Your Rearview Twice During This Stretch,” “Pump Your Brakes At This Point.”
I didn’t care to see anyone else take the test anymore, and tried to go first. However, I ended up with 4th place and due to a computer problem I got pushed back even further to second-to-last. It was torturous because after waiting all week I was chomping at the bit to do this and started pacing around the waiting area like a caged tiger at feeding time.
Eventually my turn came and just as it did, anxiety hit me like a bucket of spiders. I was no longer Ice-T: I was Flavor Flav after a root canal. And I was no longer Neo: I was Mr. Bean pretending to be a hairdresser.
I managed to retain enough of the knowledge I had to proceed, but I’m ashamed to say it was a rather embarrassing display. For example, one difference between Japan and my home country is that the wheel is on the other side of the car. That wasn’t such an issue EXCEPT for the fact that the turn signal and windshield wiper switches are also on opposite sides. In my nervous state I instinctively hit the windshield wipers on with my left hand before turning. Even worse, since it wasn’t my car, I didn’t know how to turn them off and had to fumble around with the switch mid-test while muttering “oh god, oh god, oh god,” until the officer reached over and helped me.
This happened six times during the exam.
Nevertheless, I cleared the S-Curve this time using the trick from the video which worked like a charm. However, this was as far as I had ever gotten before and a fresh bucket of daddy-long-legs was dumped over my head. As I ventured into this brand new part of the course I was in a completely panicked state and must have been doing one-two-three mirror checks at an incredibly excessive rate, like a coked-out Ray Liotta looking for imaginary helicopters at the end of Goodfellas.
▼ If there had been a camera in the car at the time I’d probably look a lot like this guy.
But I carried on, through the Crank, through the slope, and through the railroad crossing, in which you must roll down the window and listen for imaginary trains before proceeding. I had managed to keep it together just enough to make it to the end of the course…but did I pass?
I pulled the car into the motor pool and stopped. The passenger who was watching me from the backseat exited the vehicle, and must have gotten a kick out of the whole show.
“Please, exit the vehicle,” said the officer.
I was confused by the command and asked, “What?”
“Get out, please.”
“Me?”
“Yes.”
So, I looked both ways, opened the door, and stepped out. Just then I heard the officer shout, “Thank you! Get back in.”
The test continues until you step out of the vehicle so he couldn’t make a final decision until I had done that. It turned out that was actually a critical point too, because he explained that I had barely passed with a score of exactly 70 points. He told me that at the very end of the test I didn’t park the front end of the car exactly at the number pole, which was a 10-point deduction, but I still managed to have enough leftover to pass.
At that point I think I exhaled for the first time since starting the engine and felt a massive wave of relief wash all the arachnids off me. The officer asked me to ride along with the next examinee because she was last on the list. I naturally agreed, because I was so ecstatic at that moment I would have washed the car in a bikini if he’d have asked me to.
As luck would have it, that woman too passed her exam, making us the only two people who passed on that day. Who knows? Perhaps my own embarrassing display helped her to feel more comfortable.
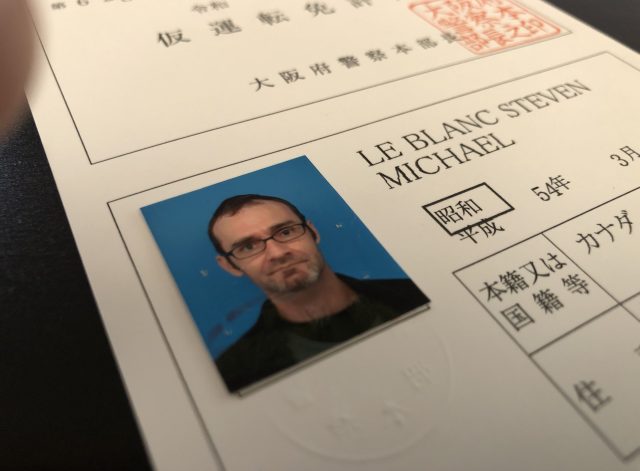
We had to wait around for a long time while the staff processed our results and prepared our learner’s permits, and I got to pay an additional 1,150 yen (US$10) in administrative fees for the pleasure. Considering how long it took and how much it cost, I was a little disappointed that it was just a big paper card and not a slick laminated one that I could fit in a wallet, but heck, a win’s a win.
I set out on this mission, partly to find out if it was really as difficult as everyone told me. Turns out it was, and although the bulk of my test-taking days are too far behind me to remember clearly, I’m still willing to say that this was the most difficult exam I had ever taken in my life.
If you follow the points I brought up throughout these articles, you can probably do well, and if you’re lucky even pass. But bear in mind that this all still isn’t everything you need to be aware of out there. Ippatsu Menkyo has pages upon pages of advice that I couldn’t possibly cover in a single article but you ought to be aware of, such as the landscape of the course. You might find some bushes lining a corner or even an truck used for examinations parked there, but know that it isn’t for decoration or a coincidence, those are all intentionally placed visual obstructions that you need to maneuver around in a certain way.
I’m not out of the woods yet either, from here I’ll have to do five two-hour independent training sessions with an instructor or licensed driver and keep a log of it to submit to the police. Then, I have to take another written test and another driving test – this time partially on real roads – in order to get the full license.
Still, according to what I’ve read, this learner’s permit exam is the biggest hurdle of the whole ordeal and those who pass it have a very good chance of passing the next driving test since you more or less have to do the same things.
So from here on out it looks like it’s just a matter of putting in the work, and I may finally be on the road to being on the road in Japan!
Getting a Driver’s License in Japan the Hard Way
Part 1 – The written test
Part 2 – The first driving test
Part 3 – The first driving test again
Photos ©SoraNews24
● Want to hear about SoraNews24’s latest articles as soon as they’re published? Follow us on Facebook and Twitter!

No hay comentarios:
Publicar un comentario